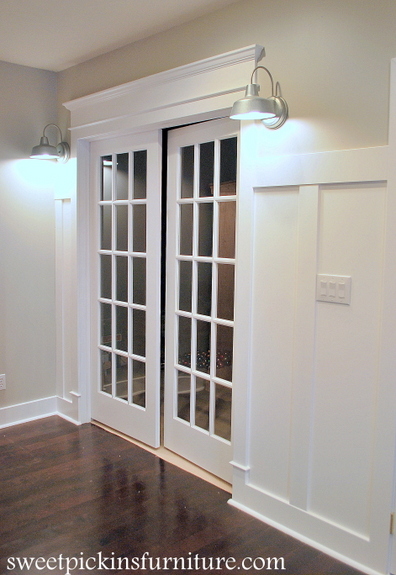
For the entrance into our “casino” room, we wanted the molding to be a little more grand. We added the lights to each side of the door, but still needed something more to make that entrance a little more special. I’ve always wanted to add molding to the doorways upstairs, so this was the perfect opportunity to give it a try.
We love the way it turned out and it was so, so easy. It seriously only took about 20 minutes per side + painting time.
……………………
Luckily, all of the moldings in our house are the flat 1×6′s, so that makes it easier for so many of the projects that we do such as adding bead board to a room, or the board and batten treatments, and now this style of door molding. If you do have the decorative molding, just google image search “lintel molding” and you will see some pics of how people have done this with their decorative molding.
Anyways, i started by trimming out the door just using normal door trim to match the rest of the house
Then i added a larger piece of molding (1×6) across the top of the door
Next, i added a small piece of decorative trim to cover the middle seam. The trim as wrapped around the front and the sides so the seam was completely hidden.
The last part of the molding, is to add a piece of decorative crown molding to cap off the top. I chose to add something on the smaller side, but my husband wishes that i did it bigger, so it may get popped off eventually to add something bigger….who knows.
The last step is to fill all the nail holes and then caulk all the seams – caulking is the most important part when it comes to trim work – im my opinion of course! It covers all the flaws or gaps that you may have and it just makes everything look seamless. Even if there is no gap between your two molding pieces now, things move and warp and caulking it will ensure that when it does, you wont ever see that seam.
………………………
We had originally planned just to do this treatment just on the one door in the basement, the casino room (we have 3 sets of french doors in one hallway) so we could have a “grand” entrance. But we love it so much that we are going to put it over each door in the basement and everywhere upstairs! So that’s why we may just pop off the molding on this one particular door and make it a little larger than the rest.
……………………….
the 411
Wall color – Repose Gray by Sherwin Williams tinted @ 125%
Door, trim and molding color – Valspar Ultra White
Lights – Outdoor lights from Lowes, sadly i think they have now been discontinued


I'm just a semi- regular girl that cant get enough of decorating and then re-decorating! Painting my house and then re-painting my house! Not to mention all the DIY projects, my furniture refinishing business and my family that supports me along the way. 


Looks great you have done a wonderful job! I would love to copy this in my hallway to my bedrooms.
and you should, its super easy!! I just messaged you back in FB by the way :)
I am in love with how your basement is turning out. I have went back and looked at all your basement posts and cant seem to find out what color gray you have used…Could you please share?
thank you, me too!! The color is repose gray from sherwin williams tinted @ 125%
Where did you get those lights? I love them and the paint color!
hey my long lost friend!!
Those are outdoor lights from lowes, but i think they might now be discontinued. Super cheap though, i think we paid about $23 for each one. The wall color is repose gray @ 125% from sherwin williams
Looks really nice. We just put those same lights on our rental house that our daughter lives in. I love them.
I have a question about your board and batten treatment. The horizontal boards (top and bottom) are flush with your door molding, so I’m assuming that they are 1x6s or 1x8s. But the vertical boards are inset from the horizontals. If you are using 1x boards for the horizontal, how do you get boards that are more “shallow” for the vertical boards?
your right on the top and bottom boards, they are 1×6 baseboards. To get the vertical boards inset a little, i used 1/2 inch thick MDF sheets for the slats. Im actually working on a post for it now – i will get that up soon :)
This looks spectacular! Looking to do something similar to finish off my fireplace redo. Thank you – so very timely! ;-)
your so very welcome!! :)
Looks so good! Whenever we caulk, it doesn’t look so seamless. Do you have any tricks/tips to offer about caulking?
thanks!! I have so many tips! I should for sure should do a post about it soon – the next time i caulk something i will be sure to take pics. The biggest tip i have is to keep a wet towel with you to wipe your finger on at all times to keep it clean, also the caulk smooths out easier if your finger is moist.
That is absolutely gorgeous!! I want all my door frames/trim to look like yours!
It looks amazing! Thanks for this post.
I love this tutorial! I am pinning, I have decorative moulding, but I really love this look! Thanks so much!
you are so welcome! I saw a couple online tutorials (when i was looking up the name for what you call this type of door molding!!) – that show you how to do it if you have decorative molding – still looked easy :)
Looks great!
Now my question is did you use Satin, Matte or Semi Gloss?
I want to try this around my propane fireplace I was just stump on how to fill in the gaps on the sides of the crown molding?
I enjoy your blog sooo much…thanks and Happy Holidays!
for all of the trim in our house, we use semi gloss valspar ultra white – makes it easy to clean!
I took ALL the door casings down in the house to do this months ago… HELP! I cut the crown molding that faces out at a 45 degree angle, but cant figure out the cuts of the crown molding that attaches to it (the small pieces on either side). UGH! I know, stupid question… I know once I figure this out it’ll be a fast project…..THANKS!! Signed, new to the miter saw :)
oh man!! I could totally help you if you were here! But im the worst at explaining!! There are tons and tons of you-tube videos that can help you!
What size trim did you use around your door?
i believe the sides are 3 1/2 – the top is 5 1/2 – both are just standard size that are from lowes